Description
Craft & Crumb Teddy Bear Cookies 255g Fun Fact!Bears are paw-some swimmers and love to dive deep underwater to catch fish!Bear-Illiant You've Finished!Let the munching and bear sharing with family and friends begin!Kit Contains:- Cookie mix- Edible eyes- Choc chips- Black icing writer- Craft activity- Annabel Karmel recipeHold on tight kidsA new baking revolution begins here!
Crafting, baking and creating things is awesome!It whisks kids off on an adventure, teaches them a batch of new skills, and makes for magical moments.Our fun foodie craft kits are inspired by little kids with Big imaginations. And here's the icing on the cake....we've partnered with famed children's cookery author. Annabel Karmel MBE, for this super-duper kit!Legendary across the land for her yummy recipes, Annabel has hopped aboard our mission here at Craft & Crumb to get even more little hands and minds inspired in the kitchen!This Annabel Approved recipe makes for the yummiest treat, and bear-licious craft activity.Fasten those aprons, it's time to have some Fun!Kate, Louise & Annabelxxx
FSC - FSC® Mix, Packaging / Supporting responsible forestry, FSC® C022661, www.fsc.org
Craft Activity: Make Your Own Teddy Bear Cookie TrayCraft & CrumbMake, Craft & MunchPacked with Oats for Energy
Pack size: 255G
Ingredients
Cookie Mix: Wheat Flour (Wheat Flour, Calcium Carbonate, Niacin, Iron, Thiamine), Wheat Gluten, Raising Agents (Sodium Bicarbonate, Calcium Phosphate, Sodium Acid Pyrophosphate), Light Brown Sugar, Wholegrain Oat Flakes, Edible Eyes: Dextrose, Corn Starch, Maltrodextrin, Sugar, Magnesium Stearate, Gum Arabic, Carnauba Wax, Colours E153, Milk Chocolate Flavoured Chips: Sugar, Palm Oil, Whey Powder (Milk), Fat Reduced Cocoa Powder, Emulsifier: Soya Lecithin, Black Icing Writer: Sugar, Glucose Syrup, Water, Rapeseed Oil, Palm Oil, Colours Vegetable Carbon, Rice Starch, Maltodextrin, Emulsifiers (Polyglycerol Esters of Fatty Acids, Mono- and Diglycerides of Fatty Acids), Flavouring, Preservative (Potassium Sorbate), Acidity Regulator (Citric Acid), Stabiliser (Pectin)
Allergy Information
For allergens, please see ingredients in bold.
Preparation and Usage
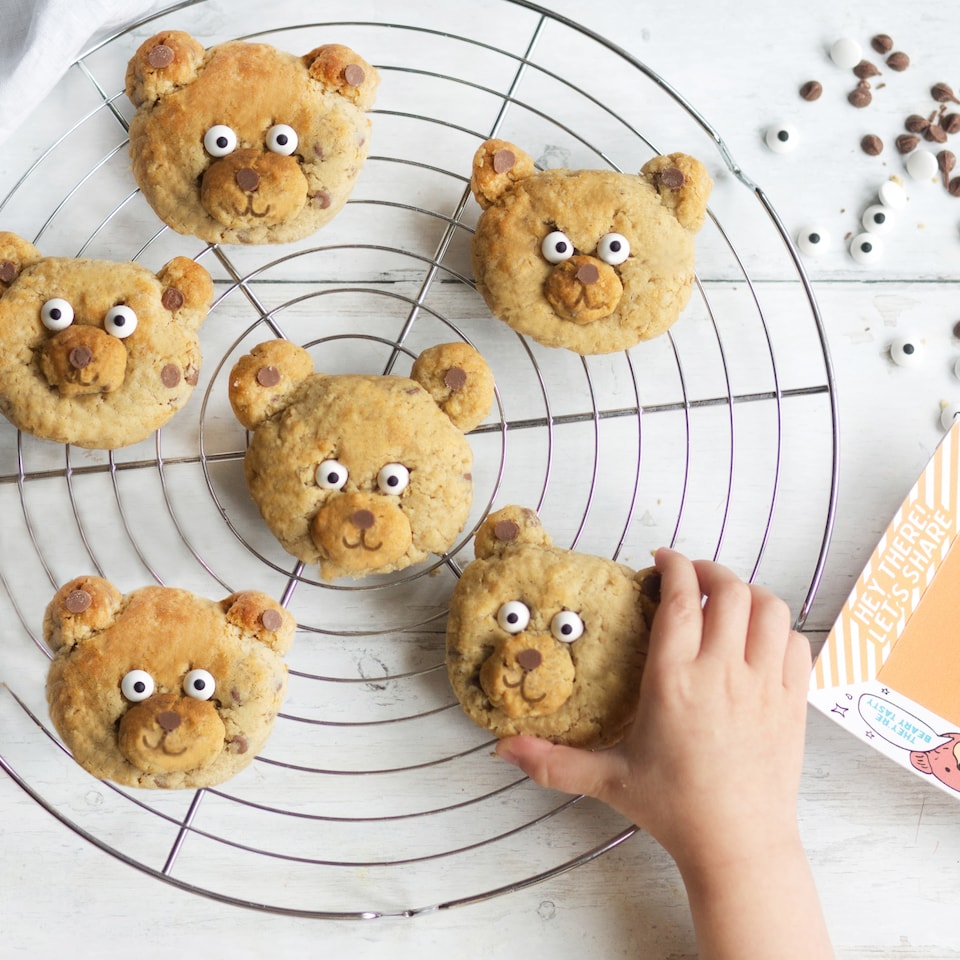
Just add butter & golden syrupHow to Make1 Prepare- Make sure your butter is softened - if still hard, pop it in the microwave for 5-10 seconds until soft.2 MixCream the unsalted butter in a mixing bowl until pale and fluffy.- Add your biscuit mix into the mixing bowl, then add 1 tablespoon of golden syrup, 1 teaspoon of vanilla extract and a pinch of salt.- Mix for a further 1-2 minutes until combined- Keep 18 choc chips to the side (for bear nose & ears, and fold the rest into the dough.- Knead the dough for a few minutes using your hands until it becomes a firm ball, then place to one side.З Вake- Preheat your oven to 180°C / 160°C Fan / Gas 4.- Now to make the bear faces, place a piece of baking parchment on the work surface and sprinkle over a little flour.- Divide the dough into 6 large balls, then nip 3 small dough pieces off each large ball.Roll them into balls and use one squashed onto the face as the base for bears nose and two squeezed on and shaped for the ears.Repeat this to make 6 bear heads in total.- Now carefully place your 6 bear heads onto a lined baking tray and place in the fridge for 30 mins - 1 hr before they go in oven, this helps them keep their beautiful bear-ish looks.- Bake for approximately 15 mins or until golden.4 Decorate- Once the cookies are cool but still soft you can push on choc chips for the ears and noses.- Finally use your icing writer to stick on the eyes then draw smiles on your happy scrummy bears.How to Make Your Bear Cookie Tray1 Cut OutWith the help of an adult, carefully cut along all the solid grey lines to cut out your tray.2 FoldUsing a ruler and the tip of a butter knife or similar blunt edge, score quite heavily along the grey dotted lines. Then fold so that the biscuit tray design is on top.3 StickUsing pritt stick or sticky tape if you prefer, stick each triangular glue flap to the underside of the striped side panel, ensuring the edge and corner lines up nicely.Press and hold each corner to ensure the glue sticks.Allow glue to dry for a few mins and that's it you're done!